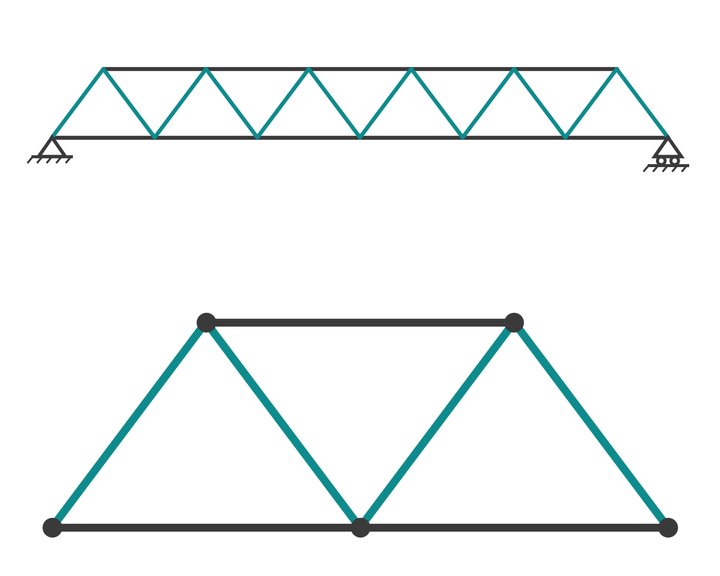
How a Warren truss works, which members are in tension and compression, and a worked six-panel example solved by the method of joints and sections.
The Warren truss is the simplest of the classic truss forms: two parallel chords joined by diagonals that alternate direction, so the web is a run of equilateral or near-equilateral triangles with no verticals. That economy of members is why it turns up in footbridges, steel roof girders, crane booms and lattice girders in platforms and plant structures.
This guide explains how the Warren truss works, which members end up in tension and which in compression, and then solves a six-panel example by the method of joints and the method of sections. For the general theory of trusses, start with our truss analysis and design guide. The other common bridge forms have their own pages: the Pratt truss, the Howe truss and the K-truss.
What is a Warren truss?
A Warren truss has a top chord, a bottom chord and a zig-zag of diagonals between them. Every diagonal is the same length and meets the chords at the same angle, so a plain Warren truss has only three member types: top chord, bottom chord and diagonal. Loads are applied at the joints, usually along the bottom chord for a bridge deck or along the top chord for a roof.
Two variants are common. A Warren truss with verticals adds a post at each joint to halve the chord panel length, which helps when the deck or purlins land between the diagonal intersections. A subdivided Warren adds secondary members inside each triangle for very long spans. This page deals with the plain form, because once you can solve that, the variants are the same arithmetic with more joints.
The form is named after James Warren, who patented it in Britain in 1848. It became the standard for riveted and later welded steel bridges because every diagonal can be cut from the same stock, and the alternating pattern means each diagonal takes a turn at carrying shear in tension and compression as the load moves across the span.
Static system
For hand analysis the truss is idealised as a set of straight, weightless members connected by frictionless pins, with all loads applied at the joints. Under those assumptions every member carries pure axial force, and the whole structure can be solved with equilibrium alone.
The support arrangement for a single span is a pin at one end and a roller at the other, which gives three reaction components. A planar truss is statically determinate when
$$ m + r = 2j $$
where \(m\) is the number of members, \(r\) the number of reaction components and \(j\) the number of joints.
The example below has 23 members, 3 reactions and 13 joints: \(23 + 3 = 26 = 2 \times 13\), so it is determinate and every member force follows from statics.
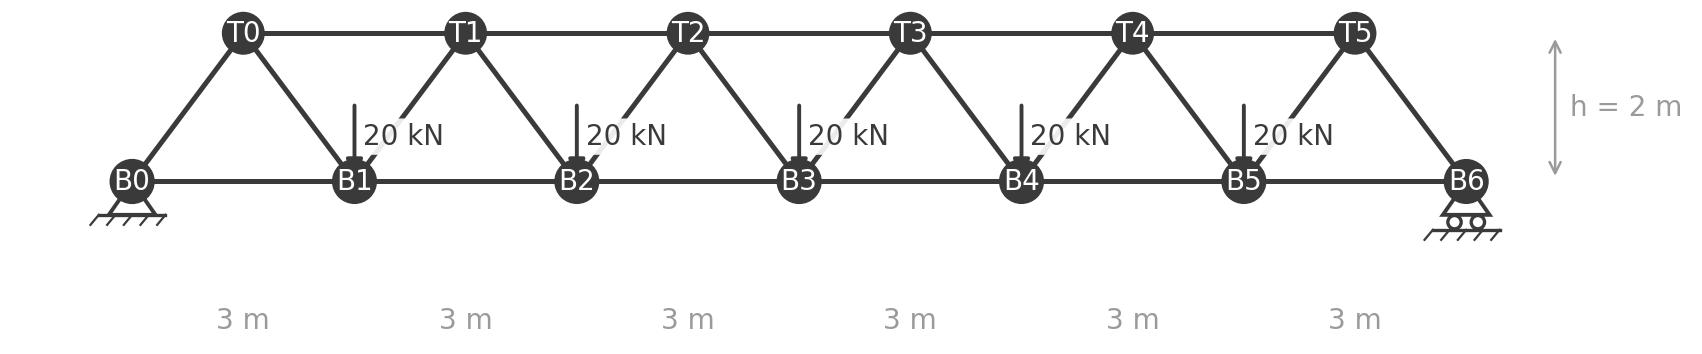
The example truss spans 18 m in six panels of 3 m. The top chord joints sit midway between the bottom chord joints at a height of 2 m, so each diagonal is \(\sqrt{1.5^2 + 2^2} = 2.5\) m long with \(\sin\theta = 0.8\) and \(\cos\theta = 0.6\). A deck load of 20 kN is applied at each of the five interior bottom chord joints.
Warren truss analysis
Every number in this section can be reproduced in the truss analysis calculator: choose Warren, an 18 m span, 2 m depth, six panels and 20 kN on the bottom chord, and read the reactions and member forces off the page.
Reaction forces
The total applied load is \(5 \times 20 = 100\) kN. The loading is symmetric about mid-span, so each support carries half:
$$ R_A = R_B = \frac{100}{2} = 50 \text{ kN} $$
For an unsymmetric load, take moments about one support to find the other reaction, then use vertical equilibrium for the remainder. The horizontal reaction at the pin is zero here because there is no horizontal load.
Method of joints
Start at a joint with no more than two unknown member forces. At the left support B0 the unknowns are the diagonal B0T0 and the bottom chord B0B1. Taking tension as positive, vertical equilibrium gives
$$ 50 + F_{B0T0} \sin\theta = 0 \quad\Rightarrow\quad F_{B0T0} = -\frac{50}{0.8} = -62.5 \text{ kN} $$
The negative sign means compression. Horizontal equilibrium then gives the bottom chord:
$$ F_{B0B1} + F_{B0T0} \cos\theta = 0 \quad\Rightarrow\quad F_{B0B1} = 62.5 \times 0.6 = 37.5 \text{ kN} $$
Move to joint T0, where the known compression in B0T0 pushes up and to the right. The only member that can balance the vertical component is the next diagonal T0B1, which must pull down with the same vertical component, so \(F_{T0B1} = +62.5\) kN (tension). Horizontal equilibrium at T0 then gives the top chord:
$$ F_{T0T1} = -(62.5 + 62.5) \times 0.6 = -75 \text{ kN} $$
Working joint by joint across the span gives every member. In practice the method of joints is the natural fit for a script, because each joint is a two-equation solve, and it is how the Python check behind the figures below was done.
Method of sections
The method of sections is quicker when you want one member in the middle of the span. Cut the truss through the second panel so the cut passes through T0T1, B1T1 and B1B2, and keep the left part with the reaction and the 20 kN load at B1.
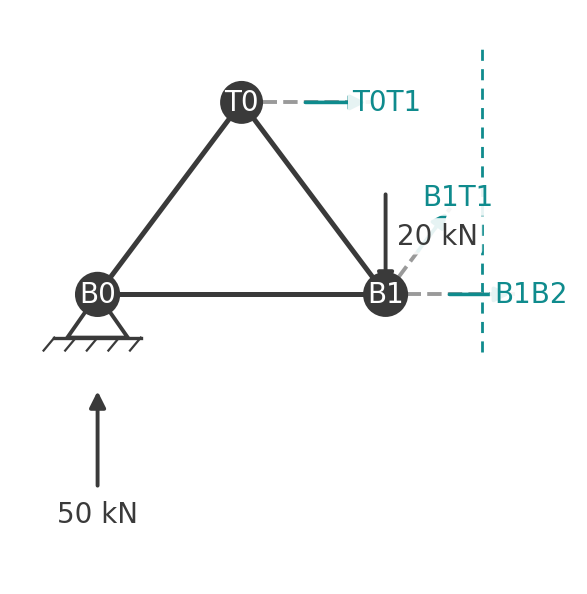
Take moments about T1, the joint where T0T1 and B1T1 meet, so only the bottom chord B1B2 appears:
$$ F_{B1B2} \times 2 = 50 \times 4.5 - 20 \times 1.5 \quad\Rightarrow\quad F_{B1B2} = \frac{195}{2} = 97.5 \text{ kN} $$
Moments about B1 isolate the top chord T0T1:
$$ F_{T0T1} \times 2 = -50 \times 3 \quad\Rightarrow\quad F_{T0T1} = -75 \text{ kN} $$
which agrees with the joint solution. Finally, vertical equilibrium of the free body gives the diagonal:
$$ 50 - 20 + F_{B1T1} \sin\theta = 0 \quad\Rightarrow\quad F_{B1T1} = -\frac{30}{0.8} = -37.5 \text{ kN} $$
Two rules of thumb fall out of this. The force in a diagonal is the panel shear divided by \(\sin\theta\), so the diagonals are heavily loaded near the supports and lightly loaded at mid-span. The force in a chord is the bending moment at the opposite chord's joint divided by the truss depth \(h\), so chord forces peak at mid-span exactly as a beam's moment does.
Compression and tension members

The full set of member forces for the example, with tension positive, is:
- Bottom chord: 37.5, 97.5, 127.5, 127.5, 97.5, 37.5 kN, all tension.
- Top chord: 75, 120, 135, 120, 75 kN, all compression. The peak of 135 kN sits at mid-span.
- Diagonals, from the left support: 62.5 (C), 62.5 (T), 37.5 (C), 37.5 (T), 12.5 (C), 12.5 (T), then the mirror image on the right half.
Under gravity load on a simply supported Warren truss, the top chord is always in compression and the bottom chord in tension, like the flanges of an I-beam. The diagonals alternate: those that rise toward mid-span are in compression and those that fall toward mid-span are in tension. The two diagonals meeting at an unloaded top chord joint carry equal and opposite forces, which is why the pairs above match.
That alternation has a design consequence. Half the diagonals are compression members and need a buckling check, and because every diagonal is the same length, the governing one is simply the most heavily loaded compression diagonal at the end of the span. Under a moving load, most diagonals see both signs at different times, so each must be checked for both. The steel bracing guide covers the same tension-compression trade-off for bracing members.
Member design and code references
Once the forces are known, each member is checked as an axially loaded element. The two references are the tension capacity and the compression (buckling) capacity:
- Tension: EN 1993-1-1 clause 6.2.3 gives \(N_{pl,Rd} = A f_y / \gamma_{M0}\) and the net-section check \(N_{u,Rd} = 0.9 A_{net} f_u / \gamma_{M2}\). AS 4100 clause 7.2 gives the equivalent \(N_t = A_g f_y\) and \(N_t = 0.85 k_t A_n f_u\), with \(\phi = 0.9\).
- Compression: EN 1993-1-1 clause 6.3.1 gives \(N_{b,Rd} = \chi A f_y / \gamma_{M1}\) with the buckling curve selected for the section. AS 4100 clauses 6.2 and 6.3 give \(N_s = k_f A_n f_y\) and \(N_c = \alpha_c N_s\), where \(\alpha_c\) is read from the member slenderness and section constant \(\alpha_b\).
- Load combinations: EN 1990 for the Eurocode route, AS/NZS 1170.0 for Australia and New Zealand. Bridge traffic loads come from EN 1991-2 or AS 5100.2.
For a Warren truss the effective length of a chord in the plane of the truss is the panel length, and out of plane it is the distance between lateral restraints, which is often several panels for the compression chord. That out-of-plane case usually governs the top chord section. Our steel member design to AS 4100 page runs both checks for a chosen section.
Advantages and disadvantages
Advantages:
- Few members and few joints for a given span, so fabrication is cheap and connections are repetitive.
- Equal-length diagonals: one cutting list, one connection detail.
- Diagonals share the shear evenly between tension and compression, and the pattern reverses cleanly under moving loads.
- Works with the deck on the top chord or the bottom chord without changing the web.
Disadvantages:
- Half the diagonals are in compression and are relatively long, so they need stockier sections than a Pratt truss's tension diagonals.
- Chord panel lengths are long, which matters if loads arrive between joints and put the chord into bending.
- Adding verticals to fix that increases the member count and partly removes the simplicity advantage.
Warren truss FAQ
Which members of a Warren truss are in compression?
Under downward load on a simply supported span, the top chord and the diagonals that rise toward mid-span are in compression. The bottom chord and the diagonals that fall toward mid-span are in tension. The signs swap for uplift or for a cantilevered truss.
What is the difference between a Warren truss and a Pratt truss?
A Pratt truss has verticals at every panel and diagonals that all slope the same way toward mid-span, so its diagonals are in tension and its verticals in compression under gravity load. A Warren truss has no verticals, and its diagonals alternate between tension and compression.
Why are Warren truss triangles equilateral?
They do not have to be, but equal 60 degree angles make every member the same length and keep the diagonal angle steep enough that shear is carried efficiently. A truss depth of about one tenth to one eighth of the span is a common starting point for a bridge.
Can a Warren truss have a cantilever?
Yes. Beyond the support the bending moment changes sign, so the top chord goes into tension and the bottom chord into compression over the cantilever, and the diagonal signs flip with it. The analysis method is unchanged.
Run it in CalcTree
The truss analysis calculator runs this example live, and switches between the Warren, Pratt, Howe and K forms on the same span. The joint-by-joint solve above is a small set of equilibrium equations, which makes it a good fit for a live CalcTree page: set the span, panel count, depth and joint loads as inputs, and the member forces, reactions and governing compression diagonal update as you change them. Pair the forces with the AS 4100 steel member check to size the chords and diagonals, or browse the template library for the Eurocode 3 equivalent.